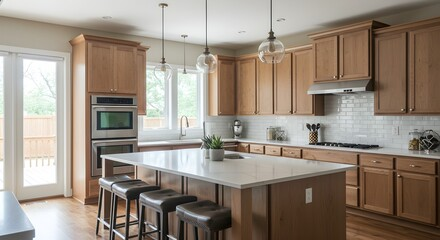
Whether you’re a DIYer or hiring cabinet painting services, you want results that look good and hold up to everyday use. Learn what materials and tools professionals use to get those gorgeous finishes.
Regular wall paint may work well enough for walls, but cabinets need something tougher. Learn about the best paint for cabinets, as well as the other important steps that make or break a long-lasting finish. Contact San Jose Cabinet Refinishing for more information.
Wood
A classic option for cabinet refinishing, solid wood is a durable material with a wide range of finishing options. It also comes in a variety of patterns and textures, giving homeowners the opportunity to make their kitchens truly one-of-a-kind. While solid wood can be more expensive than laminate or veneer, it’s a long-term investment that will last for decades.
When properly sanded and primed, wood can be painted with an array of finishes, from subtle hues like whites, grays, and tans to bolder shades of blues, greens, and reds. When it comes to choosing a finish, professional refinishers typically use lacquer, as this type of finish is durable and offers a glossy shine.
However, a high-quality lacquer finish requires careful application, as a single misstep could lead to uneven surfaces and chipping. It’s also important to clean cabinets thoroughly before refinishing, as grease and grime can interfere with adhesion. In addition, it’s critical to use a lint-free cloth to remove dust particles from the surface and prevent buildup that can dull paint over time.
Refinishing is also more environmentally sustainable than cabinet replacement, as it repurposes existing materials instead of creating new ones. In contrast, replacing cabinets generates a lot of waste and consumes raw materials and energy to manufacture. Additionally, if your old cabinets are made of low-quality materials, they may not hold up to refinishing, and you might be better off with a complete re-build.
MDF
MDF is a popular choice for painted cabinetry and other woodwork because it’s cheap, smooth and dense. The density makes it easy to work with using standard woodworking tools, and it doesn’t warp when exposed to humidity. This quality makes it ideal for use in high moisture areas such as bathrooms and laundry rooms.
MDF can also be used to make inexpensive, stylish wainscotting treatments and other wall paneling effects that feature faux tongue-and-groove designs. It’s also often combined with solid wood to add a more rustic, natural look. Solid wood is an excellent choice for cabinets because it offers timeless beauty and exceptional durability, though it comes at a higher price point and requires more maintenance than MDF.
Both MDF and plywood are great choices for cabinets because they offer a variety of finishing options. Solid wood has a naturally grainy texture that works well for doors, panels and decorative details, while MDF has a smooth surface that’s ideal for painting and laminate veneers. MDF is also easier to cut than solid wood or plywood because it doesn’t splinter.
One downside to MDF is that it absorbs water rapidly due to its extremely fine fibres. This can cause the boards to swell and lose their structural integrity over time. Another concern is that the glue used to hold the fibres together contains formaldehyde, which can release volatile organic compounds (VOC) when exposed to moisture.
To help combat these problems, contractors use moisture-resistant primers and sprayers when refinishing cabinets in high humidity environments like Texas, Louisiana, and Oklahoma. These paints and sprayers reduce drying times and allow for a more consistent finish that’s resistant to bubbles, creases, and mold growth.
Rigid Thermofoil
Thermofoil, also known as Rigid Thermoformable Foils (RTF), is a vinyl material that can be applied over medium-density fiberboard to create smooth and sleek cabinet doors. This unique vinyl wrap is highly resilient and can mimic the appearance of painted wood or stone. Its exceptional printing capabilities and surface embossing make it possible to produce realistic textures that closely resemble natural materials.
Unlike traditional wood cabinetry, which requires touch-ups and additional finishing like paint over time, thermofoil cabinets are extremely durable against moisture, dirt, and grease. This makes them an excellent choice for busy kitchens or moisture-prone bathrooms. In addition, most manufacturers of thermofoil cabinets offer a robust warranty that protects against issues like warping or peeling over time.
To ensure the longevity of your cabinetry, maintain a regular cleaning routine to remove any residue or buildup that can damage the finish. Avoid using abrasive cleaners or harsh chemicals to prevent scratching or dulling the surface. Regular cleanings also help to reduce the risk of mold and mildew.
Before starting your project, carefully label each piece of cabinetry and set them aside in a staging area for easy reassembly later. It’s important to thoroughly clean your cabinet boxes, inside and out, to remove any traces of grease or other contaminants that can affect the refacing process.
Once your cabinet boxes are clean, you’ll want to cover any backsplashes or appliances with plastic and tape to keep them protected during the refinishing process. Finally, you’ll need to sand down any rough patches or protruding bumps on the face frames and rails before applying your new refacing material. This prep will help to provide a smooth canvas for your new material and make the refacing process easier and more efficient.
Hardware
Cabinet refinishing is a detail-oriented project that requires the right tools and careful planning. It’s not a “close enough” kind of job: A half-inch of misjudged space can throw off the alignment of doors, turning your kitchen into a tilted funhouse instead of a sleek and contemporary workspace. And a rushed timeline leads to a poor finish, paint failure, or worse.
Choosing the correct materials is critical for a long-lasting, durable finish that withstands heat and moisture. It’s also important to use a high-quality primer and paint to ensure that the finished product stands up to daily wear and tear. Finally, the right hardware adds a finishing touch and can make your cabinets look like new again.
Before painting, it’s essential to strip the old surface and remove any grease or grime that may be accumulated on cabinet surfaces. Sanding the cabinet surfaces with a medium-grit sandpaper creates a smooth base for the new coat of paint, eliminating rough spots or old surface finishes. Using a fine-grit sandpaper to smooth the sanded areas further produces an even, polished surface.
Once the cabinet surface is clean and dry, it’s time to install the new hardware. Whether you choose minimalist hardware, handles with hidden hinges, or mixed-finish options, it’s important to properly clean and maintain your hardware to ensure it lasts longer.
A cabinet refinishing project is one of the best ways to refresh your kitchen without spending a fortune. But it’s important to plan ahead and understand the limitations of your skill level and available time. If you’re unsure how to proceed, hiring a professional is a smart investment that will save you money and frustration in the long run.
Paint
Professional cabinet painters have the expertise to apply paint in ways that ensure it will look beautiful and last. They know which paints hold up well to moisture and other elements, and they also understand how to properly prep surfaces and use the right tools for a smooth finish. As a result, you’ll get a high-quality finish that will enhance your cabinets and add to your home’s value and curb appeal.
When painting, professionals will begin by using a brush and mini roller to coat the backs of the cabinet doors and their frames. Once dry, they’ll flip them over and coat the fronts of the cabinets. This helps to eliminate visible start and stop points as well as provide a consistent sheen throughout your cabinetry.
Then it’s time to apply the topcoat. They’ll use the same high-quality brushes and rollers to ensure a seamless, even coating. Once the first coat is dry, they’ll sand it lightly to remove any remaining dust nibs and rough areas and ensure the next coat adheres properly.
This process may seem tedious, but it’s an essential step that many DIY homeowners skip. If you don’t sand between coats, the new paint will chip and flake much more easily.
Most professionals will also use a vacuum and tack cloth to clean the surfaces and remove any particles that could affect the final result. They’ll also carefully mask off adjacent areas to protect them from paint splatter, and they will label the doors and hardware to avoid any mismatches later. The result is a fresh, updated look that can transform the entire room and add to your home’s resale value.